Pink brocade peggie restoration, part two

Ok, you can see from the last post that she is in pretty bad condition!

Pink brocade

I gave the pink brocade a wash in something pretty strong, but that glue isn’t shifting. So, only thing to be done with it is to cut off as much as possible and hide the rest in seams and under embellishments! I have attached a fairly white band of lace to the bottom:

Cut brocade


The sequins were past being used also, so I found some nice iridescent white ones and sewed these over the ribbon:

New brocade


The skirt will be sewn together down the end and gathered at the top ready for re-fitting. Next thing to sort is the wooden peg!


The ultimate peg doll face!

The waterslide transfer faces are great for making little peggies, but check this peg doll face out!

She has been covered in fabric, sculpted and painted and is just beautiful. Take a closer look:

The detail continues throughout the whole doll right down to the beads on the front of her dress, the tiny little gold necklace and the ringlets in her hair. Someone has had alot of fun making her!

A new dolly peg…

Or rather a finished one! Time for a spring clean and to finish those peg dolls started but for some reason side lined to the work-in-progress pile. All she needed was a face, hair and arms. Oh yes and a lovely big daisy to ponder over! This fabric appears in another doll on this site, can you spot which one? Another view of her:

Geisha

So I got all of my dolls out over Christmas and gave them a bit of a sort. Amongst them are some of the first ones I made including this Geisha doll:

The design is a fairly simple one: The fabric is wrapped around the body in a tube and sewn up along the back, and the sleeves are rectangles sewn up along one edge and a pipecleaner threaded through. I made another tube in pink and tied it around her wasit creating two loops which I sewed into place:

I used cotton embroidery thread for the hair which I glued to her head in spirals. I made a bun in the same way and added lengths of wire for her hair ornaments.

Some drops of beads sewn on to the front of her hair finished her off nicely!

Well travelled peggies

Thank you to Ann who sent me these little peggies all the way from San Fransisco! I wonder if they have made it back home again?

Painted vintage pegs

I have some what neglected my little peg dolls and this blog over the last few months, so I shall attempt to remedy that this month! If you are new to this site, let me just run through what you can expect to find here:

Lots of picture of dolls old and new (mine and others), to inspire you

Peg doll projects -learn how to make you very own doll with these step by step guides

Peg doll video project

Restoration projects

Hints, tips and ideas for your own dolls

Peg doll kits and goodies for you to buy

Use the tags to find what you are looking for, or browse through the posts. If you have any dolls of your own, (including ones made by yourself!) why not show them of here on the ‘Your dolly peg’ page? Send me your images to: dollypegdoll@yahoo.co.uk

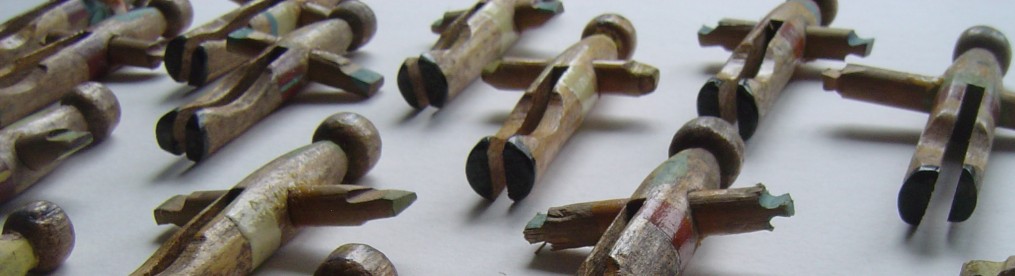
I thought it would be a good idea to kick off from the lull of that last few months with an explanation of the dolls at the top the blog. These are the oldest ones I have . I was told they are about 1930’s- 1940’s, and there is a set of 18. All bar one have wooden arms, the final one having a pipecleaner. They are crudely painted in yellow, blue and red and are varnished. I think they are fantastic and have plans to paint modern versions! Here is the whole family:

Keep any eye out for the new ones! In the next post we will look at some peg doll patterns…

Peg doll restoration project

I have done several restoration projects recently and thought I would try this one in video format! Follow the link below to see the following restoration:

Peg doll restoration video


Twin trouble

Being a twin myself, I was delighted to open up the latest collection of dolls to land on my door mat, and find these twin peggies inside!

Ok, I know they are just two of the same doll, but it pleased me none the less!

Fortune teller

This unusual doll came in a lot of dolls. I loved the skirt and as my interest is in peg dolls, I thought I would turn this one into a Gypsy fortune teller. I dismantled the doll carefully in order to be able to reuse as many parts as possible:


I had some plastic pegs made especially for peg doll projects and have never tried them so I thought I would use one for this doll.  This is the finished result:


I made a bodice out of satin ribbon and replaced the skirt and the beaded waist band from the original doll. I also re-used the head scarf adding on jump rings for earrings. I gave her a paper flower to hold in new pipe cleaner arms. The face features are moulded into these plastic pegs so I bought the facial features out with acrylic paints.


Restoration project

Some dolls just need a little repair to bring them back to life. This peg came in quite good condition, all her clothes were sewn on which always helps (no nasty glue residue to try and get rid of). Don’t forget you can use the step by step photos of all the restoraton projects on this blog to help you make your own doll.

The original doll:

The first thing to do is take the doll apart trying to keep all the parts in as good a condition as possible


I sanded the face off as the face wasn’t in the centre. I took a photograph however, so I could paint on the new face to be like the old one. I also painted on red shoes then varnished the whole peg. I used a piece of new lace to make a bodice to go under the dress just by wrapping it around the peg and sewing it together at the back:

I decided to make the dress into a skirt. I added on a piece of the same lace I used for the bodice along the bottom of the skirt. It was already well stitched into a tube so I didn’t need to restitch it although I did iron it before I put it back on the peg, and I did sew a new gathering thread around the top of the skirt. I gathered this up, placed the skirt on the peg and sewed the thread up tightly. I bent the original pipe cleaner arms into shape and placed arounde the back of the doll sewing them to the lace bodice to hold them in place:


I ironed the shawl and recut the edges just to neaten them up. I wrapped it around her shoulders and sewed in together at the front with a sequin and bead. I made new hair but used brown wool as she had had before.


Now she looks as good as new!